Welcome to the Tea for Teal blog!

Thanks for reading! Here you'll find a random assortment of sewing projects, food, make-up reviews, the occasional book and movie review, my travels, and anything else that pops into my head!
If you like something please feel free to Follow Me on Pinterest

Thursday, March 22, 2012

Birthday Trifle


Birthday Trifle

     For my birthday I didn’t want the usual cake with the typical bunch of candles. I wanted something where everyone could blow out a candle. I find that moment of attention where everyone is waiting for you to attempt to blow out a ton of candles while your probably spitting all over the cake… awkward.


     So, I decided to make individual trifles, a staple in the British dessert arena and in keeping with my birthday theme.  I remember vividly the first time I ate trifle. It was a Marks & Spencer’s individual trifle cup and to this day it is still the best trifle I have ever had.


This is how I made my own variation.

     First, keep in mind that these are American British trifles. Other than the fruit every other ingredient, especially the custard, is different in America. Still good though (plus, other than me, who’s going to know?!)

     I did this over three days so I spent a minimal amount of time each night on it.


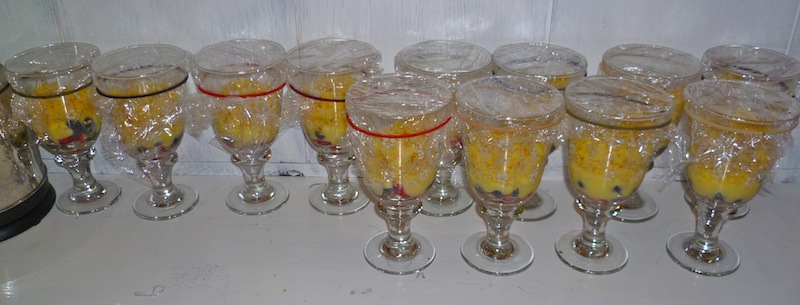
Makes 12 glass goblets


1st layer: 3 days out - Fruit mix: Cut the fruit and sprinkle with sugar a couple days ahead of time and refrigerate in Tupperware. I used Strawberries and blueberries. Raspberries would have been awesome they are super expensive.


2nd layer: 2 days out – Custard. In America this is just vanilla pudding. I used instant vanilla pudding and one packet was good for one layer with ¼ cup in each goblet. Go ahead and make this ahead of time. It keeps well.


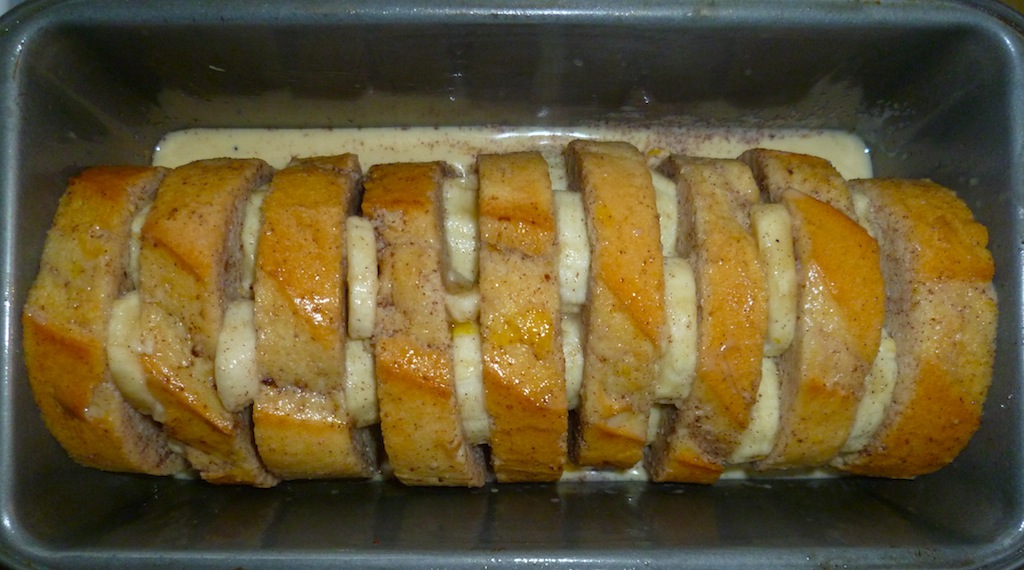
3rd layer: 3 days out -Bake a cake, homemade or from a mix, and let it cool completely (overnight is good).
                  2 days out – Remove the hard crusts and crumble the soft inside of the cake in large chunks. If you are making a large trifle you can just cut the cake to fit.


     I then covered and let sit overnight. To keep cake soft make sure it’s sealed tightly.


4th layer: Custard

5th layer: Fruit


6th layer: Immediately - Whipped cream. The closest to authentic is heavy whipped cream. 
NOTE: The cream will fall flat in minutes but cool whip is totally the wrong taste. So, put the whipped cream on at the last minute.
Ansell stopped me right after this picture to tell me about the whipped cream falling. So learned that lesson the hard way.
 
     You can layer fruit, custard, and cake as much as you want. A basic trifle is simply fruit, custard, cake, cream with one layer of each. If you do layer don’t make the layers too thick. The beauty of trifle is you should be able to get a bit of each layer in each bite.

     A big strawberry and candle is the finishing touch.


Delicious!!!


Tuesday, March 20, 2012

Jambalaya & Baked Banana French Toast


Jambalaya & Baked Banana French Toast


Charla taught me how to make Jambalaya based on her recipe (which I’m sure she adapted from somewhere but I'm still giving her all the kudos :).

2 Tb. olive oil
8 oz. sausage (I usually get turkey andouille)
~ 8 oz. chicken, cooked
1 large onion
3-5 cloves garlic
1/2 tsp. dried thyme
1/2 tsp. parsley, dried or fresh
1 1/2 c. boiling chicken stock
1 1/2 c. white rice
1/4 tsp. cayenne pepper
1 tsp. hot sauce
1 14 oz. can tomatoes
1 green bell pepper
2 Tb. white wine


Heat oil in saucepan. Add sausage and brown. Add chicken and onions, cook for about 3 min. Add garlic, thyme, and parsley. Stir well, then add stock, rice, cayenne, and hot sauce. Add bell peppers and tomatoes with juice and break up with a spoon. Bring mixture to a boil, stir well, cover and simmer gently 15-20 min. Stir, add white wine and cook another 5 min. 


Charla was very good at walking me through everything but I’m not sure if I could do this again without Charla, or without getting totally overwhelmed and frustrated. However, I am feeling more comfortable in the kitchen and tackling recipes with more than four steps or ingredients.


Also, the basics of doing this meal project, such as cooking chicken and sausage was really useful. I also learned how to appropriately cut vegetables and chicken and it’s these basic cooking skills that are really necessary to learn.


As always I had a fun time and the food turned out really delicious! Success! Next time I would cut down the quantity being made since Ansell and I ate jambalaya basically everyday for 5 days straight.


Baked Banana French Toast

Before being baked

I am a huge breakfast fan and my latent cooking skills always shine when I do breakfast. I found this amazing recipe from Bakerella’s awesome website and couldn’t wait to try it! I wasn’t disappointed!


This is a fairly simple breakfast food that has a few things that make it a favorite:

   * It is in a contained baking tray which makes it
o   -Easy cooking and cleaning
o   -Reduces possible burning
o   -All pieces were warm when we ate since it was all cooked together

After the oven time

   *It involves bananas. I love bananas baked in breakfast stuff.

*It needs to chill so it’s perfect for making the night before.

*Look how photogenic it is!


This is such a winner!  Will definitely make it again!


Sunday, March 18, 2012

Tea Party Invitations


Tea Party Invitations

The Making of…

My theme for this party was a (somewhat) British Afternoon Tea and the colors were spring based with purple, green, and yellow. I wanted the invitations to reflect all of that!

1.  I went to PaperSource and bought a pack of green envelopes, purple premade folded cards, and a giant piece of yellow flowery paper. I think it all cost a total of $15. So, I could have bought premade cards for the same price but then I wouldn’t have a fun project!


I’ve really been into making silhouettes lately so my idea was to put teapot silhouettes on the cards.

2.  I used a picture of a teapot to make my template, which would fit appropriately on the purple card. Then cut the yellow paper into pieces the right size for making the teapots.


3.  Next was tracing the teapots on the back of the yellow paper pieces and cutting them out. Basic scissors work well for this part but ascertain how many invitations you want to make before you start all the tracing and cutting!


4.  Then, using an exacto-knife, cut out the middle part of the teapot handle.

5.  Paste all the teapots onto the purple cards. I jazzed up the purple cards a bit by cutting a wave into the bottom of the card. This would be easier with those shaped scissors but it wasn’t time consuming with regular scissors either.


6.
 On the inside of the card I choose to print out the actual invitation with day, date, time, etc on my computer then print and paste it into the card. This should have been faster than handwriting it all but I had a hard time not being OCD about the look of the printed invitation and it ended up being the most time consuming part.


7.  To make the invitations look really fancy, use a calligraphy pen (you know the kind that you can get in craft stores that make it LOOK like you know calligraphy) to write the recipients name.


8.  The final touch is the addition of a tea sachet. I read this idea somewhere online and thought it was brilliant and super cute!

Despite all the steps, and dependant on the number of invitations being made, these invitations only would have taken an hour or so…but I did this between doing a bunch of other stuff so it took me longer.


The final result is a totally customizable and unique card. You could make any silhouette from flowers to faces and the color scheme is easily changeable. Include a sweet touch like a seed packet for a garden party or a rice sachet for a wedding invitation and take the invitation up one more notch!


I had a lot of fun making these invitations and look forward to another invitation project!


PS. All those little inside teapot handle pieces? I made into adorable flowers!


Check out my Instructable


Friday, March 2, 2012

Last minute Lacrosse

You can't see it, but Ansell is stealing my coat.


Last Minute Lacrosse


      Last Friday, Ansell saw a lacrosse game happening at Georgetown and I bustled out to meet him there. 


According to wiki, lacrosse is "a team of Native American origin played using a small rubber ball and a long-handled stick called a crosse or lacrosse stick, mainly played in the US and Canada. Offensively, the objective of the game is to score by shooting the ball into an opponent's goal, using the lacrosse stick to catch, carry, and pass the ball to do so.


         I was surprised at how much I enjoyed the game. I think lacrosse is very interesting and am fascinated that these guys can pass a tiny ball back and forth with just a small net on a stick. I can't wait to see more games (preferably in warmer weather).


Ah yes, Ansell doing a candid pose. 
      Unfortunately in this game Georgetown lost 11 to 16 to Maryland. The Maryland team was much better and their swiftness was impressive. Georgetown was getting slaughtered but in the last quarter fought their way up from 6 to 11. 


       Also the games at Georgetown have food vendors that actually have affordable food and nice hot chocolate! YAY!