Welcome to the Tea for Teal blog!

Thanks for reading! Here you'll find a random assortment of sewing projects, food, make-up reviews, the occasional book and movie review, my travels, and anything else that pops into my head!
If you like something please feel free to Follow Me on Pinterest

Showing posts with label party. Show all posts

Friday, October 12, 2012

The Great Gatsby Party!


The Great Gatsby Party!


Last month a friend of ours threw a big Great Gatsby costume party.


I was pretty excited about it and timed my hair appointment for the week before the party so I would have a freshly cut 1920s bob.


I also had Arika send me the 1920s dress I had left with her, which she kindly did. I took in the dress a little bit on the sides so it was still baggy ala 1920s but without looking like wearing a moo-moo.


She also sent me a lovely pair of earrings, which I paired with the outfit. 


I also wore my snake bracelet, which was a Christmas present from Ansell, a long string of pearls I found at a used store for $5 (and have worn so much since then), a shorter strand of pearls, fancy headband I had in my headband stash, patent leather shoes I found year ago at a second store in Florida, and blinged out ring from H&M.


I looked up photos of 1920s makeup and tried to re-create the color schemes and style. As usually I should have pushed the envelope more and made it bolder. (sigh)


Ansell was equally dashing and already had most of the outfit. He simply ordered a boater hat, put everything together, and BAM! 1920s gentleman.


Once we got to the party I COMPLETELY FORGOT TO TAKE ANY PHOTOS. I’m so ashamed of myself because there was so much cool stuff and people really went for the theme. Our host, Adam, had glasses arranged to say “1920” and everyone was dressed really well. It was a successful party and I enjoyed myself thoroughly. Just wish I had taken some photos.


Here are some photos taken by others.


Can't wait for the movie! Darn you WB for pushing back the release day!


Thursday, March 22, 2012

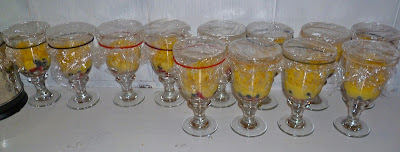
Birthday Trifle


Birthday Trifle

     For my birthday I didn’t want the usual cake with the typical bunch of candles. I wanted something where everyone could blow out a candle. I find that moment of attention where everyone is waiting for you to attempt to blow out a ton of candles while your probably spitting all over the cake… awkward.


     So, I decided to make individual trifles, a staple in the British dessert arena and in keeping with my birthday theme.  I remember vividly the first time I ate trifle. It was a Marks & Spencer’s individual trifle cup and to this day it is still the best trifle I have ever had.


This is how I made my own variation.

     First, keep in mind that these are American British trifles. Other than the fruit every other ingredient, especially the custard, is different in America. Still good though (plus, other than me, who’s going to know?!)

     I did this over three days so I spent a minimal amount of time each night on it.


Makes 12 glass goblets


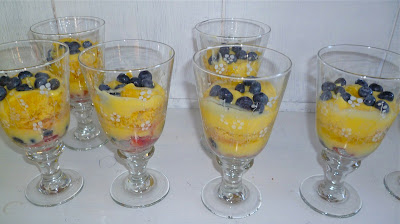
1st layer: 3 days out - Fruit mix: Cut the fruit and sprinkle with sugar a couple days ahead of time and refrigerate in Tupperware. I used Strawberries and blueberries. Raspberries would have been awesome they are super expensive.


2nd layer: 2 days out – Custard. In America this is just vanilla pudding. I used instant vanilla pudding and one packet was good for one layer with ¼ cup in each goblet. Go ahead and make this ahead of time. It keeps well.


3rd layer: 3 days out -Bake a cake, homemade or from a mix, and let it cool completely (overnight is good).
                  2 days out – Remove the hard crusts and crumble the soft inside of the cake in large chunks. If you are making a large trifle you can just cut the cake to fit.


     I then covered and let sit overnight. To keep cake soft make sure it’s sealed tightly.


4th layer: Custard

5th layer: Fruit


6th layer: Immediately - Whipped cream. The closest to authentic is heavy whipped cream. 
NOTE: The cream will fall flat in minutes but cool whip is totally the wrong taste. So, put the whipped cream on at the last minute.
Ansell stopped me right after this picture to tell me about the whipped cream falling. So learned that lesson the hard way.
 
     You can layer fruit, custard, and cake as much as you want. A basic trifle is simply fruit, custard, cake, cream with one layer of each. If you do layer don’t make the layers too thick. The beauty of trifle is you should be able to get a bit of each layer in each bite.

     A big strawberry and candle is the finishing touch.


Delicious!!!


Sunday, March 18, 2012

Tea Party Invitations


Tea Party Invitations

The Making of…

My theme for this party was a (somewhat) British Afternoon Tea and the colors were spring based with purple, green, and yellow. I wanted the invitations to reflect all of that!

1.  I went to PaperSource and bought a pack of green envelopes, purple premade folded cards, and a giant piece of yellow flowery paper. I think it all cost a total of $15. So, I could have bought premade cards for the same price but then I wouldn’t have a fun project!


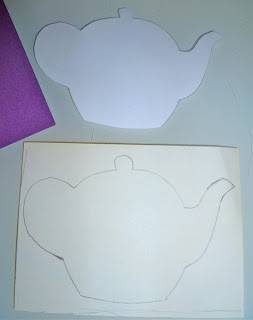
I’ve really been into making silhouettes lately so my idea was to put teapot silhouettes on the cards.

2.  I used a picture of a teapot to make my template, which would fit appropriately on the purple card. Then cut the yellow paper into pieces the right size for making the teapots.


3.  Next was tracing the teapots on the back of the yellow paper pieces and cutting them out. Basic scissors work well for this part but ascertain how many invitations you want to make before you start all the tracing and cutting!


4.  Then, using an exacto-knife, cut out the middle part of the teapot handle.

5.  Paste all the teapots onto the purple cards. I jazzed up the purple cards a bit by cutting a wave into the bottom of the card. This would be easier with those shaped scissors but it wasn’t time consuming with regular scissors either.


6.
 On the inside of the card I choose to print out the actual invitation with day, date, time, etc on my computer then print and paste it into the card. This should have been faster than handwriting it all but I had a hard time not being OCD about the look of the printed invitation and it ended up being the most time consuming part.


7.  To make the invitations look really fancy, use a calligraphy pen (you know the kind that you can get in craft stores that make it LOOK like you know calligraphy) to write the recipients name.


8.  The final touch is the addition of a tea sachet. I read this idea somewhere online and thought it was brilliant and super cute!

Despite all the steps, and dependant on the number of invitations being made, these invitations only would have taken an hour or so…but I did this between doing a bunch of other stuff so it took me longer.


The final result is a totally customizable and unique card. You could make any silhouette from flowers to faces and the color scheme is easily changeable. Include a sweet touch like a seed packet for a garden party or a rice sachet for a wedding invitation and take the invitation up one more notch!


I had a lot of fun making these invitations and look forward to another invitation project!


PS. All those little inside teapot handle pieces? I made into adorable flowers!


Check out my Instructable


Thursday, February 23, 2012

Ansell's Spanish House Party


Spanish House Party


Ansell invited a few friends over for a Spanish themed party. In total we had about 12 people and it was a great mix of company.


BAM!
Ansell made all the Spanish tapas himself. Here is he working on a Spanish omelet.


In total he made:


Grilled pepper sticks


Serrano ham with various olives on baguettes


Chorizo and Manchego, Tuna and tomato with anchovies, salmon and cream cheese with olives and cream cheese with guava paste on crackers. Shiva brought along peanut butter cookies.


Toasted bread with garlic and tomato, potatoes with aioli, deviled eggs (I did those!), Spanish omelets, and various olives.


One of our friends Jessie and his girlfriend brought along a baguette with Brie and homemade olive spread and sweet date spread.


Brian made an amazing pastry dessert with Brie and sugared walnuts.


Haysel made a delicious stiff flan that I didn’t get a picture of unfortunately.


We heard and exchanged some interesting stories while we ate. 


Mock fights broke out and champagne runs were made.


Then we smoked the hookah and Ansell showed our group some hookah tricks.


If you get a toilet paper tube, dip it into dish soap, then blow hookah smoke through it you can make smoke bubbles.


It’s fun to see how long you can keep the bubble in the air until it bursts.


It was a great night and a great success! Can’t wait to have another one… as long as Ansell still does the cooking!


The Look! Hippy Chic

  
I used the Glacial Grove Collection from Meow Cosmetics for this look. 


Woodlands was the eyeliner, Thicket on the eye, with Icebound as the brow highlight. I dusted the Gold Aurora from Meow Cosmetics over the whole eye for extra shine.